
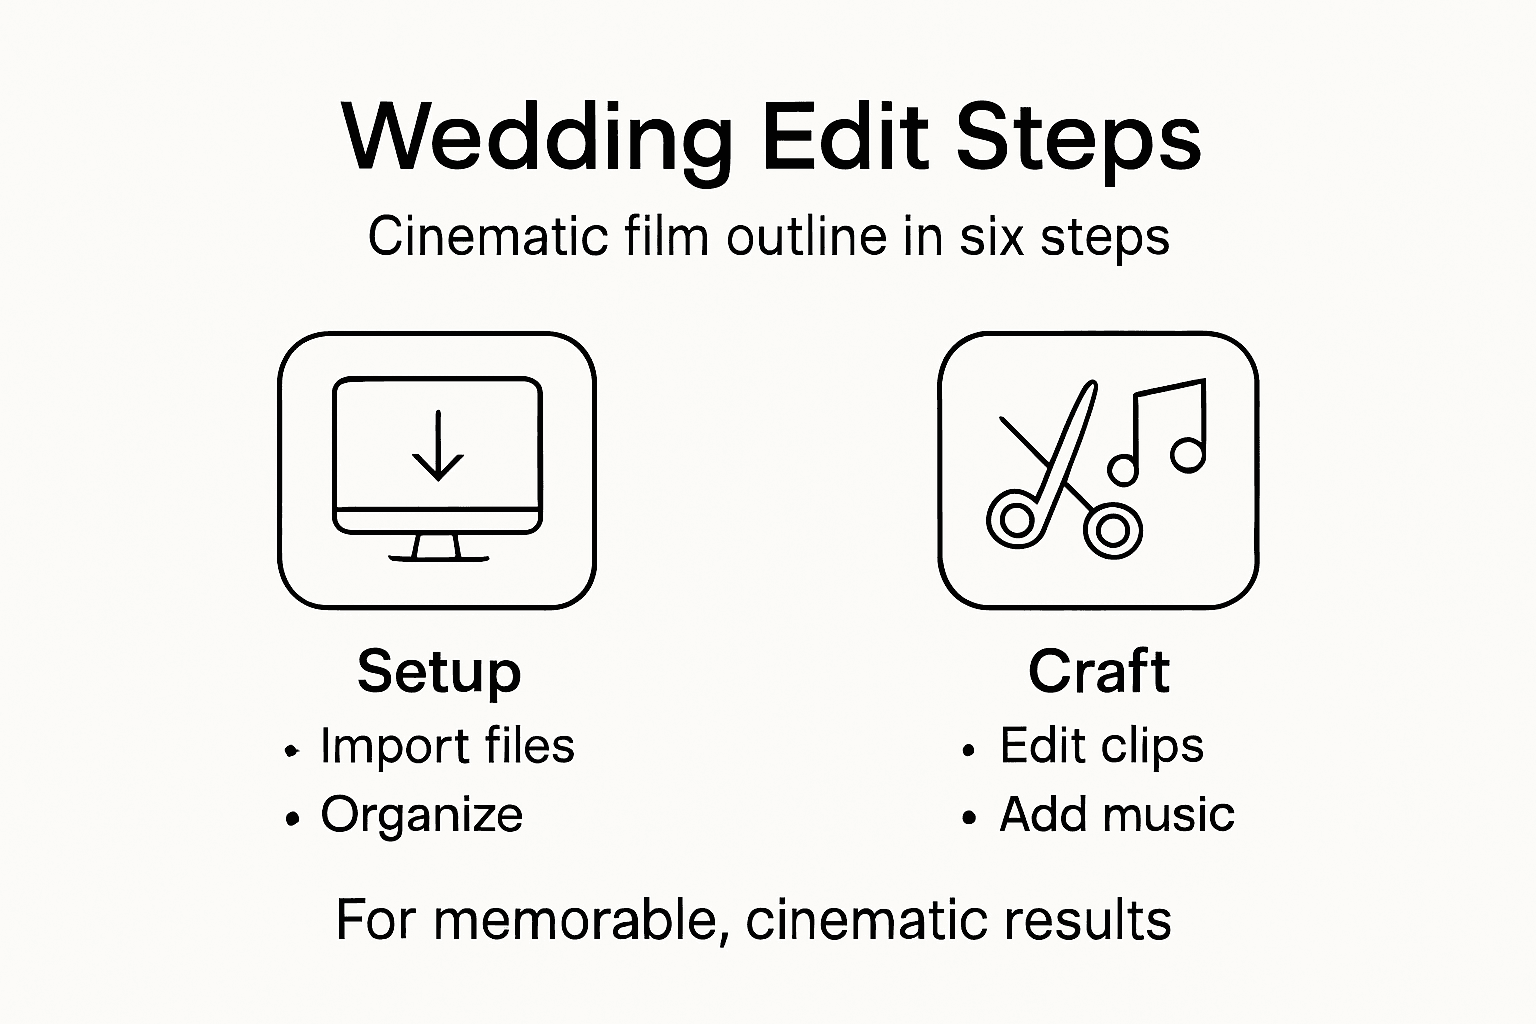
Wedding Video Editing Steps for a Cinematic Final Film
- Jesús Magan
- Jan 26
- 13 min read


Sorting through wedding footage can feel as overwhelming as arranging your Staffordshire guest list, but a little preparation turns chaos into clarity. For couples who want their wedding film to tell a story rather than feel like a jumble, the way you organise and highlight your video files shapes the whole experience. By focusing on organising footage and structuring your narrative from the start, you set yourself up for a wedding film that captures real moments and emotions rather than just hours of raw material.
Table of Contents
Quick Summary
Key Point | Explanation |
1. Organise your media effectively | Create a detailed folder structure to easily locate your wedding footage during editing, which saves time and enhances narrative flow. |
2. Highlight key moments for storytelling | Identify and log significant clips like vows and dances to craft a compelling narrative that captures the couple’s day meaningfully. |
3. Use simple transitions for a polished edit | Opt for straightforward transitions between clips to maintain narrative pacing and ensure focus remains on the couple’s story. |
4. Balance audio for emotional impact | Choose appropriate music and adjust audio levels to blend natural sounds with the soundtrack, ensuring clarity of dialogues during significant moments. |
5. Check and export in multiple formats | Review your film thoroughly for inconsistencies before exporting in various formats suited for different sharing platforms, protecting the couple’s memories. |
Step 1: Prepare footage and organise media
Before you touch the editing software, your footage needs a home. This step involves importing all your wedding video files into a logical system where you can find exactly what you need without hunting through hundreds of clips. Think of it like organising your reception photos by location and moment rather than dumping them all into one folder. When you invest time in organising media within editing software, you’ll save yourself hours of frustration later and build a stronger narrative structure from the start.
Start by creating a clear folder hierarchy on your computer. Create a main project folder with your wedding date and couple names, then subdivide it into sections like “Ceremony”, “Reception”, “Speeches”, “Getting Ready”, and “Details”. As you import footage from your camera or memory cards, copy everything into these folders rather than working directly from the cards. This protects your original files and gives you a working copy to edit. Next, review your footage and create a quick log of what you have. You don’t need to watch every second, but note which clips contain key moments. Did you capture the first kiss? The father of the bride’s speech? These markers become your roadmap during editing. Understanding your file structure and digital video formats ensures smooth playback and prevents technical hiccups when you start cutting. Most editing software works best with standardised formats, so if you’re mixing footage from different cameras, make a note of the resolutions and frame rates you’re working with.
Once your files are sorted and logged, create a backup. Copy your entire project folder to an external drive or cloud storage. Wedding footage is irreplaceable, and one corrupted hard drive can ruin months of memories. This takes thirty minutes now but prevents disaster later.
Professional tip Rename your video files with timestamps and content descriptions before importing them into your editing software, such as “2024-06-15_Ceremony_0001.mp4” rather than relying on camera-generated names like “MVI5467.mov”, which saves enormous amounts of time when searching for specific moments during the editing process.
Here is a quick reference for common wedding footage organisation methods and their benefits:
Organisation Method | Example Usage | Benefit |
Folder hierarchy by moment | Ceremony, Reception, Speeches folders | Simplifies searching |
File renaming with details | ‘2024-06-15_Ceremony_0001.mp4’ | Easier clip identification |
Logging key moments | Note first kiss, speeches, reactions | Guides narrative editing |
Backing up project folder | External drive or cloud storage | Prevents data loss |
Step 2: Select highlights and create the storyline
With your footage organised, you now face the creative heart of wedding film editing. This step involves watching through all your material, identifying the moments that matter most, and arranging them into a narrative that flows naturally from beginning to end. Your wedding tells a story, and your job is to pull out the threads that make it compelling rather than trying to include everything.
Start by creating a highlights reel. Watch through your organised footage and flag the standout moments. These are your ceremony vows, the first kiss, the father of the bride’s speech, the couple’s first dance, and those candid moments of genuine laughter and emotion. As you identify these, select the most impactful moments in raw footage and note their timecodes. You might end up with 30 to 50 candidate clips from several hours of footage. Don’t overthink this stage. Your instinct knows when something feels special. Once you have your highlights, think about the arc. A wedding film typically follows the day chronologically, but within that structure, you’re building emotional peaks and valleys. The getting ready scenes build anticipation, the ceremony creates the emotional climax, and the reception shows celebration and joy. When you develop a clear storyline with your best shots, you’re essentially crafting a visual narrative that holds your couple’s attention from the opening frame to the final shot.
Now arrange your highlights in sequence. Create a rough outline on paper or in a simple document listing your key moments in order. This becomes your editing blueprint. You don’t need every moment of speeches or dancing. Instead, select the most meaningful parts that advance your story. Include reaction shots of family members, close ups of details, and those quiet moments between guests. These create texture and breathing room. The goal is a film that captures the emotional truth of the day, not a comprehensive recording of every second. Most wedding films run between 6 and 10 minutes for a highlights reel, though some couples want longer edits.
Professional tip Create a simple spreadsheet listing your selected clips with their timecodes, descriptions, and approximate duration, which transforms your rough outline into a precise editing roadmap and prevents you from losing track of where your best moments sit within hours of footage.
Step 3: Edit clips and refine transitions
Now comes the actual cutting and shaping of your film. This is where your rough outline becomes a polished sequence, where you trim away the unnecessary moments and connect your highlights with smooth, intentional transitions. Think of it as sculpting your story from the raw material you’ve gathered.
Begin by importing your selected clips into your editing timeline in the order you planned. Most editing software allows you to drag and drop clips, which makes this stage straightforward. Watch each clip and trim the beginning and end points to remove awkward pauses or false starts. If someone looks at the camera before smiling at their partner, cut that hesitation out. If a speech has a long pause before the laugh lands, trim the silence. These small cuts tighten the pacing and keep viewers engaged. As you work through your clips, you’ll notice natural places where one moment ends and another begins. These are your cut points. Some transitions can be simple cuts where one clip stops and the next begins instantly. This works brilliantly for energetic moments like the first dance or celebratory speeches. For more reflective transitions, such as moving from getting ready to the ceremony, you might want something gentler. Transitions create visual flow by adjusting clip opacity and timing, allowing you to fade between scenes rather than cutting abruptly. A fade to black works well between major sections of your day. A gentle dissolve, where one image fades into the next, feels more intimate and works beautifully for emotional moments.

When applying transitions, resist the urge to use fancy effects everywhere. A wedding film benefits from simplicity. Seamless transitions maintain pacing and audience engagement whilst keeping focus on your couple rather than on clever technical tricks. A 0.5 to 1 second transition typically feels natural and doesn’t draw attention to itself. Watch your edit from start to finish, paying attention to rhythm. Does the pacing feel right? Are there moments where it drags? Sometimes removing a few seconds transforms the entire feel. Trust your instincts about what feels right emotionally. A good edit should flow so smoothly that viewers never think about the transitions themselves. They should simply experience your couple’s story unfolding.
Professional tip Save multiple versions of your edit with different names as you work through this stage, such as “Edit_v1”, “Edit_v2”, allowing you to experiment freely and easily return to earlier versions if a new approach doesn’t work as well as you hoped.
Step 4: Add music and enhance audio
Music transforms a wedding film from a collection of clips into an emotional experience. This step involves selecting the right soundtrack and balancing it with the natural sounds from your day, creating an audio landscape that supports your visual narrative. Your couple will remember how the film made them feel, and music plays a huge role in that emotional response.
Start by choosing your music. Think about the mood you want to create for different sections. The getting ready sequence might benefit from something uplifting and gentle, whilst the ceremony calls for something meaningful and reflective. The reception celebration deserves energy and joy. Many couples select songs that are personally significant to them, perhaps the track from their first dance or a piece that represents their relationship. When choosing music, ensure you have the proper licensing rights. Royalty-free music libraries offer thousands of options specifically created for video use, and they eliminate legal complications. Once you’ve selected your tracks, import them into your editing software timeline alongside your video. Choose appropriate music that complements the video’s mood and consider how the rhythm and energy of the music can enhance key moments. If you have a particularly important moment, such as the first kiss, timing it to a musical swell or beat creates added impact.
Now comes the balancing act. Your film contains natural audio from the day such as vows, laughter, and music from the reception. You need to blend this with your chosen soundtrack so neither overwhelms the other. Balance audio levels and synchronise music with visuals for a cinematic effect. Lower the music volume during important spoken moments like vows or toasts so viewers can hear what’s being said. Let the music swell during montage sequences where there’s no dialogue. Listen through your entire film with fresh ears, noticing where the audio feels natural and where it feels jarring. If there’s background noise from the reception or microphone feedback, use your editing software’s audio tools to reduce it. Most editors include noise reduction filters that can significantly improve audio quality. The goal is a polished sound where music and natural audio work together rather than competing for attention. Test your final mix on different speakers, including headphones, to ensure it sounds good across various playback systems.
Professional tip Create separate audio tracks for your background music, natural sound, and any voice over or narration in your editing software, which allows you to adjust each element independently and gives you complete control over the final audio balance without affecting other elements.
Step 5: Colour grade and apply finishing touches
Colour grading is where your wedding film truly becomes cinematic. This step involves adjusting the colour, contrast, and brightness of your clips to create a consistent visual style and evoke the emotional mood you want. It’s the difference between footage that looks like it came from a camera and footage that looks like art.
Begin by understanding what colour grading does. Your clips may have been filmed under different lighting conditions. The getting ready scenes might be shot in warm, golden sunlight whilst the ceremony was in cooler, dimmer church light. Without colour grading, these clips clash visually. Colour grading brings them into harmony. You can apply colour correction tools to balance tones across clips and create a cohesive look throughout your film. Most editing software includes basic colour adjustment tools such as exposure, saturation, and temperature controls. Start with the ceremony footage and establish a look you like, then apply similar adjustments to other sections. Decide on the overall aesthetic. Do you want warm, golden tones that feel romantic and intimate? Cool, crisp tones that feel modern and clean? Slightly desaturated colours that feel timeless and elegant? This choice should reflect the couple’s personality and the mood of their day. Once you’ve chosen your direction, apply finishing touches using colour grading to enhance visual aesthetics by working through each clip methodically. Don’t over correct. Subtle adjustments often look better than extreme ones. A slight increase in saturation makes colours pop without looking artificial. A small decrease in highlights prevents blown out, washed out skin tones.
Beyond colour grading, add finishing touches that polish your film. Add opening and closing titles with the couple’s names and wedding date. Include any text overlays that add context, such as location names or dates if you’re showing multiple days. Some couples enjoy subtle text during key moments like “Mr and Mrs” when they kiss. Keep typography clean and readable. Add subtle effects like a fade to black between major sections or a slight vignette that draws focus toward the centre of the frame. Review your entire film one final time, watching it as though you’re seeing it for the first time. Does it flow? Does it feel emotionally complete? Are there moments that still feel jarring? Make final tweaks and prepare for export.
Professional tip Create a master colour grade by adjusting one clip, then save it as a preset or LUT (Look Up Table) within your editing software, which you can then apply to all other clips instantly for consistency and saves considerable time during the colour grading process.
Step 6: Review and export the final video
You’re nearly there. This final step involves watching your complete film with critical eyes, checking for any issues you might have missed, and then exporting it in the right format for sharing. Think of it as the quality control stage before your masterpiece goes out into the world.
Start by watching your entire film from beginning to end without stopping. Watch it fresh, as though you’re a guest seeing it for the first time. Does the story flow naturally? Are there moments that feel too slow or too rushed? Does the audio sound balanced when you watch on different devices? Pay attention to technical issues such as audio sync problems, colour inconsistencies, or clips that appear out of focus. Check that all your titles are spelled correctly and that text overlays appear at the right moments. Look for any accidental jump cuts or moments where the footage feels jarring. When you review the edited video for narrative flow and visual consistency, you’re checking that everything works together as a cohesive whole. If you spot issues, make notes and return to the editing timeline to fix them. Sometimes a simple trim of a few frames or a slight audio adjustment makes all the difference. Ask your partner or a trusted friend to watch it too. Fresh eyes often catch things you’ve become too close to notice.
Once you’re satisfied with the edit, it’s time to export. This is where format matters. Your wedding film needs to work in multiple places. You might want to share it on social media, upload it to a cloud service, or burn it onto a DVD for guests. Each platform has different requirements. Select appropriate export settings based on intended use to ensure your film maintains its cinematic quality. For online sharing, an MP4 file at 1920 x 1080 resolution and 30 frames per second works well across most platforms and keeps file sizes manageable. If you’re creating a file for archival or personal use, consider exporting at a higher quality such as ProRes or a master file format. Before exporting, ensure your project is saved with a clear final name, then run the export. Depending on your film’s length and your computer’s speed, this can take anywhere from a few minutes to an hour. Once the export completes, watch the exported file from start to finish to verify it looks and sounds exactly as intended. Check that the colours haven’t shifted, the audio hasn’t dropped, and that the entire film plays without stuttering. Create backup copies of your final video file on external drives and cloud storage. Your couple will treasure this film, and you want to ensure it’s protected.
Professional tip Export multiple versions of your final film in different formats simultaneously, such as a high quality master file for archival, an MP4 for sharing online, and a lower resolution version for email, which ensures you have the right version ready for any situation without having to re-export.
Below is a summary of recommended export formats for different sharing platforms:
Use Case | Preferred Format | Typical Resolution | Key Advantage |
Social media | MP4 | 1920 x 1080 | Universal compatibility |
Archival/long-term | ProRes or master file | Highest available | Preserves full quality |
Email sharing | Compressed MP4 | 720 x 480 or similar | Faster transfer speed |
DVD for guests | MPEG-2 or DVD format | Standard definition | Suitable for physical media |
Capture Your Wedding Story with Cinematic Expertise
Editing a wedding video to create a truly cinematic final film requires careful organisation, storytelling, and emotional pacing. We understand how challenging it is to select highlights, refine transitions, balance music and audio, and apply colour grading to perfectly reflect your day’s atmosphere. Many couples struggle with these technical yet heartfelt details when trying to preserve the magic of their wedding month. That is why trusting seasoned professionals who specialise in natural, unobtrusive, documentary-style wedding videography can make all the difference.
Elevate your wedding memories with Wedding Film Photography, based in Staffordshire, UK. Our award-winning team combines storytelling expertise with cinematic editing finesse to deliver a polished film that captures your emotions exactly as they unfolded. From meticulous planning and capturing candid moments to delivering perfectly balanced soundtracks and seamless colour grading, we handle every step of the process so you don’t have to. Discover how we transform hours of footage into a heartfelt narrative you will treasure forever by visiting our main website. Ready to create your timeless wedding film? Explore our service packages and get in touch today to begin your cinematic journey.
Frequently Asked Questions
What is the first step in wedding video editing?
The first step in wedding video editing is preparing your footage and organising your media. Create a clear folder structure with sections such as ‘Ceremony’, ‘Reception’, and ‘Speeches’ to ensure easy access to your clips later. Organising your files means less frustration during the editing process.
How do I create a highlights reel for a wedding film?
To create a highlights reel, watch your organised footage and flag the standout moments, such as the first kiss and key speeches. Make a note of their timecodes, and then compile these clips into a rough outline to form the initial structure of your wedding film.
What are effective techniques for editing clips and transitions?
Effective techniques include trimming awkward pauses from clips and using simple transitions like cuts and fades to maintain the narrative flow. After arranging your clips according to your outline, aim for clean transitions that enhance the emotional impact of your film.
How do I choose the right music for my wedding video?
Choose music that reflects the mood of different sections of the film, such as uplifting tracks for candid moments and reflective pieces for the ceremony. Ensure you select music with appropriate licensing rights and consider timing significant moments in the video to align with musical peaks for added impact.
What are some colour grading tips for a wedding film?
Start colour grading by correcting any inconsistencies caused by different lighting conditions during filming. Apply adjustments like exposure and saturation uniformly across clips to create a cohesive visual style that enhances the emotional tone of your film.
How should I export the final wedding video?
When exporting your final wedding video, select formats suitable for your intended use, such as MP4 for social media sharing and a higher quality format for archival purposes. Remember to save backup copies of the exported file on external drives to ensure the precious memories are protected.
Recommended

Comments